The Best DIY Advent Calendars to Make With Your Kids
Christmas isn’t just about the one day—it’s a whole month of decorating, cookie-baking, merry-making and thinking about the true meaning of the holiday. And by crafting a DIY Advent calendar with your little one, you can plan on each day being just a teensy bit more special. Many of these Advent calendar ideas use items you probably already have, like paper cups, balloons and cotton balls. And because you decide on the daily loot, you can think beyond sugar and opt for meaningful treats, such as a homemade coupon for a fun activity or a slip of paper with a joke or poem you can share. What’s more? Discovering together what each day brings is a great way to build excitement, plus a chance (depending on the age of your child), to hone fine motor skills, explore numbers and time and practice perhaps the hardest thing of all: patience. Here, a few of our favorite DIY Advent calendar ideas for toddlers.
Turn your extra party cups into treat containers with this perky garland idea from Pretty Little Party Shop.
What you’ll need: 24 paper cups, tissue paper, scissors, large sewing needle, twine, treats, rubber band, number stickers (1 through 24).
How to make it: Cut circles of tissue paper to cover each cup, then, with the needle and twine, string the cups together. Fill with treats, cover with tissue and hold it in place with a rubber band. Add number stickers to mark the days.
If you can fold, you can DIY this brilliant Advent calendar for toddlers from Fox + Star. Try a rainbow-colored palette for a less traditional Christmas vibe.
What you’ll need: origami paper, treats, washi tape, white paper, pen, clothespins.
How to make it: Fold origami paper into treat bags (see directions on the Fox + Star site for details). Fill with candy and seal with washi tape. Make number labels with paper and pen, then use a clothespin to hold the date label onto the bag.
Pop goes the Advent calendar! This giant “tree”—built with balloon ornaments from Look What I Made—was initially dreamt up for grown-ups, but with a few adjustments, this is a great Advent calendar for toddlers too.
What you’ll need: 24 balloons, white and black paper, scissors, glue, pen, scrap wood (optional), wire (optional), tape (if not using wood and wire).
How to make it: Write notes to your child onto slips of paper—it could simply be a reason why you love him so much, or a description of an activity you both can do together that day (for instance: building a snowman, baking cookies, watching a holiday movie). Then stick one slip of paper into each balloon, and blow them up. Cut black paper into shapes that look like ornament toppers and glue them to cover the tied part of the balloons. Write dates onto each balloon, and hang each onto a piece of scrap wood with wire, or simply tape the balloons directly to your wall.
Sheep are great for counting, and not just at bedtime! With this sweet and simple project from Kreative Buehne, your child will look forward to making the sheep’s fleece fluffier day after day.
What you’ll need: computer paper and printer, gray paper, 24 cotton balls, glue.
How to make it: Print out the template (at the end of Kreative buehne’s blog post) on gray paper and cut out the sheep. Now simply have your child glue a cotton ball onto the corresponding dot each day.
Kids have double the fun with this clever block DIY Advent calendar from All for the Boys—the daily treat boxes double as tres chic building blocks.
What you’ll need: 24 2”x2” white favor boxes, ruler, Sharpie.
How to make it: Decorate each block as shown, then number the back 1 through 25. Add treats inside and close. Your child will love building with them long after the treats are gone!
Future urban planners can let their imagination run wild with this colorful cityscape homemade Advent calendar from Mr. Printables. Compared to the fun they’ll have playing with it, the treat inside each building is simply an added bonus.
What you’ll need: computer and printer, scissors, treats, glue
How to make it: Print and cut out template PDFs (scroll down the Mr. Printables post to print directly) and fold as directed. Glue them partially closed, add treats, then seal each one.
Mini takeout boxes are just right for packing up little treats. Get 24 to build this Advent calendar for toddlersfrom Studio DIY. As each day goes by, re-use each container to pack holiday gifts you’re giving to others.
What you’ll need: 24 colored mini take-out boxes, number stickers, treats.
How to make it: Stick the numbers onto the boxes, fill with treats, then stack into a tree shape.
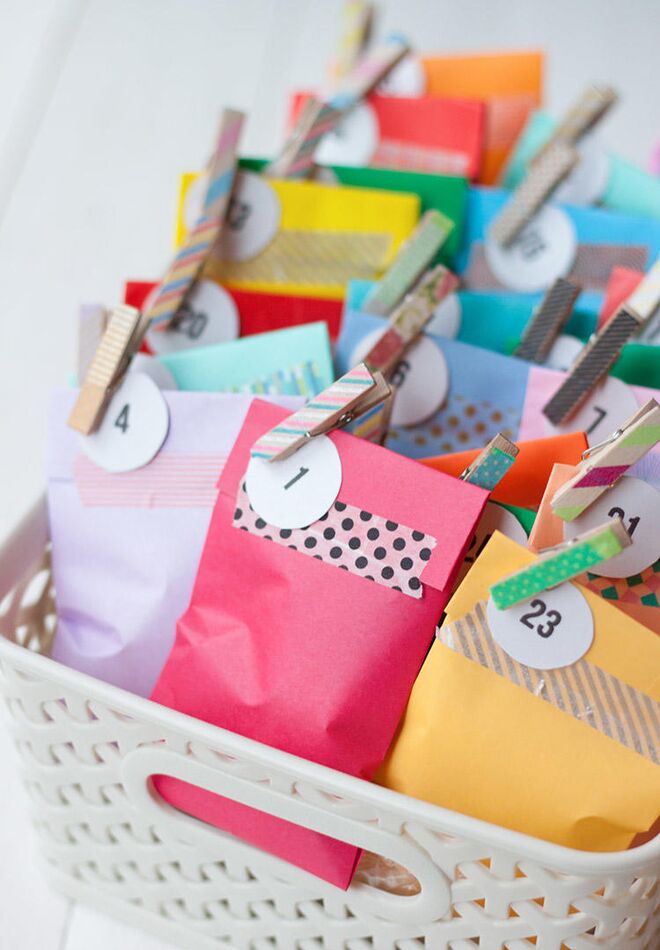
This treat bag garland from Yellow Bliss Road can be made by downloading the free template or simply using ready-made treat bags.
What you’ll need: computer paper and printer (or store-bought treat bags), treats, twine, tacks, washi tape, 24 clothespins.
How to make it: Print and assemble treat bags using the templates on the Yellow Bliss Road site, if you’re making the bags (or just unwrap the bags you purchased!). Fill each with a piece of candy or a slip of paper describing an activity to do with your child that day (such gathering old toys and bringing them to Goodwill)—or both! Hang twine across the wall. Seal bags with washi tape, then clip onto the twine with clothespins.
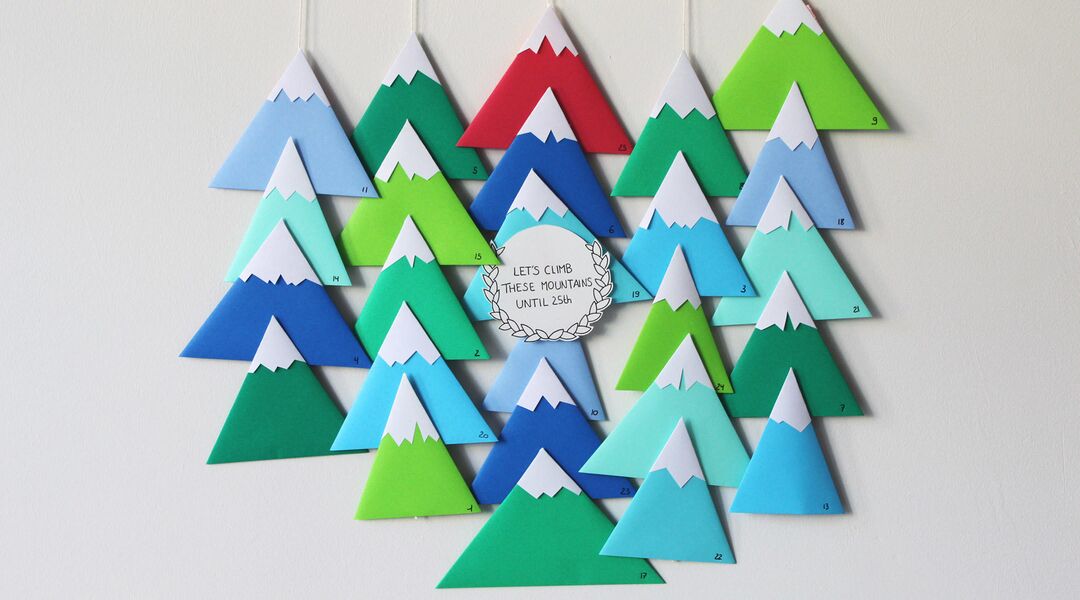
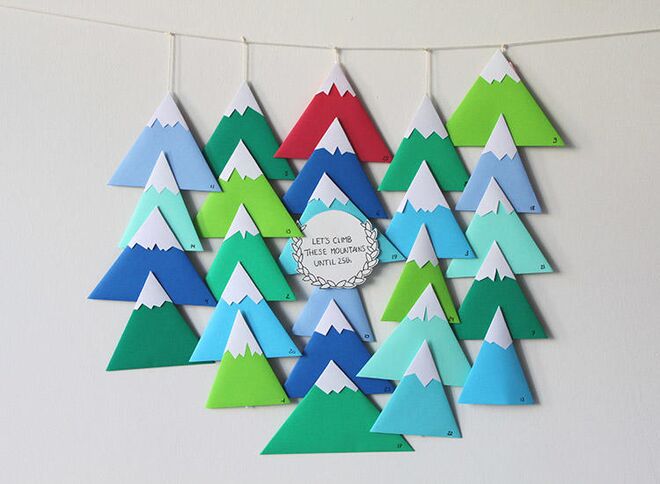
Little fingers will get a lot of fine motor skill practice with this simple yet elegant kids Advent calendar origami project from Le Plus Belage.
What you’ll need: colored and white origami paper, scissors, treats, tape, string, tacks.
How to make it: Cut and fold the paper into mountain-shaped treat envelopes (see the Le Plus Belage site for details) and slip pieces of paper with fun quotes, jokes or activity ideas (go skating! Build a snowman!). Add snowcap cutouts and tape close. Then string together, hang up and admire!
These pretty Advent treat containers from Design Mom are simpler to pull off than they look—thanks to a downloadable template.
What you’ll need: computer paper and printer, scissors, tape, slips of paper, pen, stapler.
How to make it: Write out fun activities on slips of paper. Print and cut out templates on site. Roll up as shown, staple one end shut, add a slip of paper to each, then staple shut with the numbers attached. Arrange on a tray or in a big bowl (in which case, hunting for the right number will be part of the fun!).
The fun in this DIY Advent calendar from Tell Love & Party is all in the bag, from pretty pink stripes to a jolly blast of cherry red. And it’s much easier to assemble than it looks.
What you’ll need: 24 paper treat bags, treats, ribbon, washi tape, wood board.
How to make it: Fill bags with treats, then fold and tape them closed. Wrap with ribbon, tape them into place on the board and hang at a level so kids can reach.
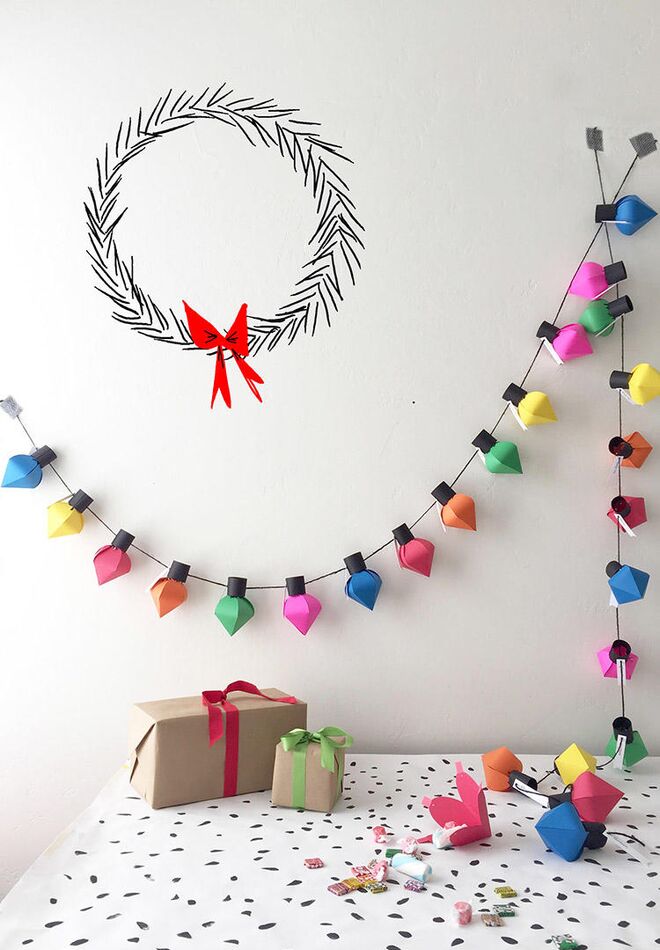
This Christmas bulb-shaped garland from The House that Lars Built can be hung on a mantel or tree to to brighten your home.
What you’ll need: computer paper and printer, craft knife, colored paper, scissors, glue, hole punch, twine, tacks.
How to make it: Print out the templates, then score onto colored paper with craft knife and cut out. Assemble as directed, then fill with treats and seal. String onto the twine, then deck the halls with it!
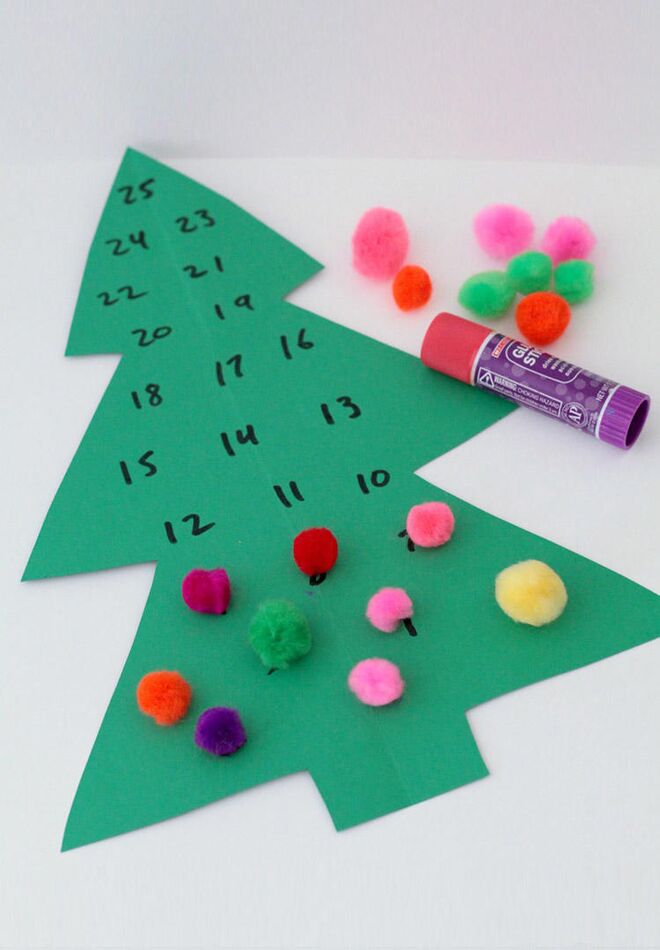
This cheerful project from Schooling a Monkey is a great learning tool—and of the Advent calendar ideas, quite possibly the easiest one you can possibly make.
What you’ll need: green felt, scissors, permanent marker, 24 pom-poms, glue.
How to make it: Cut a tree shape out of felt and write your numbers onto the tree. Each day, help your child glue a pom-pom onto the correct date.
If your child is Lego-obsessed, then this countdown from Little Bins for Little Hands will keep your pint-sized builders busy. Pack the pieces for winter-themed building challenges (snowmen, reindeer, a stocking) in number bags, then watch them get to work.
What you’ll need: 24 small treat packets, 24 clothespins, red and green paper, Lego bricks, tray or bowl.
How to make it: Using your ideas or the ones from the site, place the Lego pieces for each challenge inside its own bag (instructions for more elaborate builds are here), then close it up with clothespins and a numbered label. Arrange on a tray or place into a bowl.
Little tikes can put their pow-wham-bop superhero moves to the test with this action-packed countdown from You Are My Fave.
What you’ll need: poster board, scissors, tissue paper, tape, marker, paper bags, treats.
How to make it: Cut circles out of the poster board, number the holes 1 through 24, then tape pieces of tissue paper to the back. Trim down the paper bags and cut slits at the top edge so they’ll lie flat behind the holes. Add treats, then tape a bag behind each hole. Punch through a circle a day to grab a treat.
Here’s a sweet centerpiece of a DIY Advent calendar for your mantel or dining table from A Lovely Lark. Once each container is open, your kids can use them as toys!
What you’ll need: computer paper, printer, paint pen, stickers tape, treats.
How to make it: Print and cut out templates and assemble as shown on A Lovely Lark. Tape them closed, decorate and hide treats underneath.
If your kids appreciate a good pun and knock-knock joke, they’ll be in stitches every day with this clever sugar-free Advent calendar for toddlers from Modern Parents Messy Kids.
What you’ll need: computer paper, printer, scissors, hole punch, marker, floral wire, washi tape.
How to make it: Print and cut out ornament and joke templates. Glue jokes to the back of the ornaments. Punch holes at the top of each ornament, string onto floral wire and attach to the wall with washi tape.
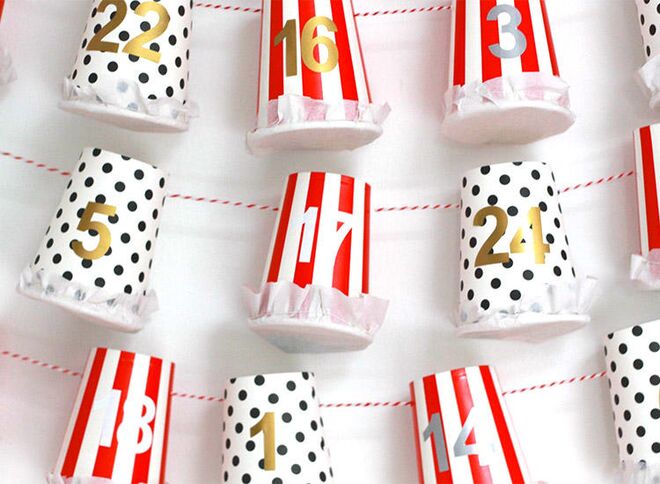
Every day leading up to Christmas starts with a party when you’ve strung up these these pinata-inspired countdown decorations from Handmade Charlotte.
What you’ll need: tissue paper, 24 paper cups, a nail or other sharp object, twine, treats, cardstock, scissors, glue, tacks.
How to make it: Fringe a few strips of tissue and glue them to the side of the cup. Punch two holes at the bottom and tie twine to it, as shown on the Handmade Charlotte blog post (you’ll use this to hang the pinata). Flip the cup over and fill with lightweight treats. Cut 24 2-inch circles from cardstock, make two holes and tie a length of twine to it, then cut 4-inch circles from the tissue paper. Now place the smaller circle on top of the loot and thread the paper circle through the string so it covers the cardboard circle and loot. Glue the paper circle to the rim of the cup. Once dry, hang upside-down with tack and pull the bottom string to open the pinata.
With this sweet Advent calendar for toddlers from Poppytalk, your little one will love discovering new activities each day, while making an ever ever-growing garland.
What you’ll need: empty jar (such as a tomato sauce jar), 24 pompoms, colored paper, pen, glue, needle, twine.
How to make it: Cut strips of colored paper, number each one, and write down a holiday activity idea for each. Glue to pompoms. Once dry, drop them into the jar. Have your child take one out each day, then string the pompom onto twine to form a jolly garland, just in time for Christmas!
Published October 2017
Navigate forward to interact with the calendar and select a date. Press the question mark key to get the keyboard shortcuts for changing dates.


